
A Galaxy at War
A Look at How Objectives Shape Gameplay in Star Wars™: Armada
“My ship has fallen under attack and I’m afraid my mission to bring you to Alderaan has failed. I have placed information vital to the survival of the Rebellion into the memory systems of this R2 unit. My father will know how to retrieve it. You must see this droid safely delivered to him on Alderaan. This is our most desperate hour.”
–Leia Organa
Recently, in our preview of the fleet-building rules for Star Wars™: Armada, we mentioned that each fleet must contain three objectives. These objectives add a narrative element to your games, helping to explain why you and your opponent are sending starships into battle. More importantly, though, objectives change how you score points, meaning that your games of Armada aren’t just about blasting away more of your opponent’s starships than you lose in the process.
Today, we’ll look at these objectives more closely, reviewing all twelve of them, and exploring how they may influence the path you take toward victory.

The objectives of Star Wars: Armada work along with its starships, squadrons, maneuver tool, ship cards, upgrades, command dials, attack dice, and obstacles to ensure that every single one of your battles has multiple dimensions.
Choosing an Objective
There are three categories of objectives in Armada, and you have to bring one objective from each category.

Assault: Assault objectives typically identify one or more ships that are worth extra fleet points when destroyed.

Defense: Defense objectives encourage you to position your ships so that they control specific sections of the battlefield.

Navigation: Navigation objectives reward you for maneuvering aggressively and with precision.
Early in the game’s setup, you and your opponent choose one objective to use for the game.
Setup Step 3. Determine Initiative: The player whose fleet has the lowest total fleet point cost chooses which player is the first player. The first player places the initiative token next to his edge with the a side faceup. If the players are tied in fleet points, flip a coin to decide which player makes the choice.
Setup Step 4. Choose Objective: The first player looks at all three of his opponent’s objectives cards and chooses one to be the objective for the game.
The other objectives are all set aside.
Throughout your game, the additional rules and scoring concerns that the objective introduces can greatly impact your tactics. Therefore, although it’s usually to your advantage to have the initiative throughout a game, it’s easy to imagine situations in which you’ll concede the initiative to your opponent in order to ensure that you play with one of your objectives, forcing your opponent to fight on terms that are favorable to your fleet.
Assault
The four different assault objectives are Advanced Gunnery , Most Wanted , Precision Strike , and Opening Salvo .
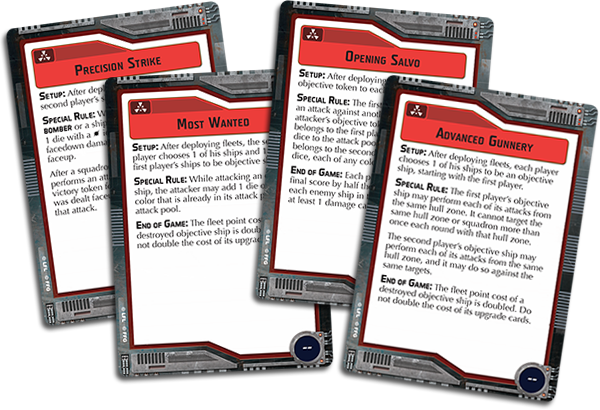
Of these assault objectives, two force you and your opponent to identify objective ships, which are worth twice as many victory points at the end of the game if they’re destroyed.
In the case of Advanced Gunnery, your objective ship gains a large tactical advantage, even as it becomes a marked target. Of course, this tactical advantage becomes even more meaningful the more dice you’re able to train upon your enemies. For example, the objective allows a Victory II-class Star Destroyer to fire all six of its front hull zone’s six attack dice a second time. That’s a significant step up from the three attack dice you’d be able to fire from the Star Destroyers left or right hull zone, especially if you didn’t have a legal target in either of those zones.
However, because Advanced Gunnery favors ships, like the Star Destroyer, that feature massive armaments, Rebel players may favor Most Wanted, which adds an extra attack die to each attack against an objective ship. Because the Rebellion’s ships are generally smaller and cost fewer fleet points than the Empire’s, you can fit more of their ships into an Armada fleet. Then, if you have a fleet with five copies of the CR90 Corvette A , the extra dice you’ll gain from Most Wanted will very quickly add up.
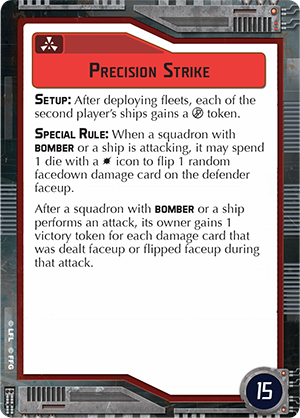
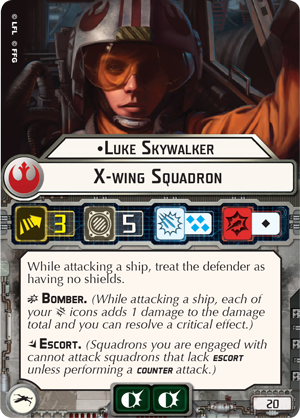
The third of these objectives, Precision Strike, features a victory point value of “15” in its bottom right corner. This means that you score fifteen victory points for each victory token you earn over the course of the game. Thus, rather than rewarding you for eliminating a prized enemy ship, Precision Strike rewards you for repeatedly dealing faceup damage cards to your opponent. This objective may be a good choice for any fleet that can guarantee critical hits, such as one that features Admiral Screed , or it could be good for any fleet that uses Luke Skywalker and Dodonna's Pride to bypass enemy shields and deal faceup damage.
Finally, the Opening Salvo objective adds extra dice to both players’ opening attacks. At the beginning of the game, each ship is marked with an objective token that it spends on its first attack against another ship. When it spends this token, it gains two attack dice. If it’s the first player’s ship, it gains two red attack dice. If it’s the second player’s ship, it gains two attack dice of the player’s choice. However, these extra dice do more than make it easier for you to obliterate your opponent’s biggest ship; they force you to make an important decision. Will you focus your fire or spread it around to force damage onto each of your opponent’s ships?
Because Opening Salvo allows you to score half the fleet point cost of each enemy ship that you damage, you can just as easily score the same number of points by damaging two identical ships as you can by fully eliminating one of them. As an example, if you were playing against a fleet with two Victory-class Star Destroyers, that means you could score the same number of points by punching through the one point of rear shielding to land a single damage on each as you could by blasting through all eight hull.
Defense
The four defense objectives are Fire Lanes , Contested Outpost , Fleet Ambush , and Hyperspace Assault .
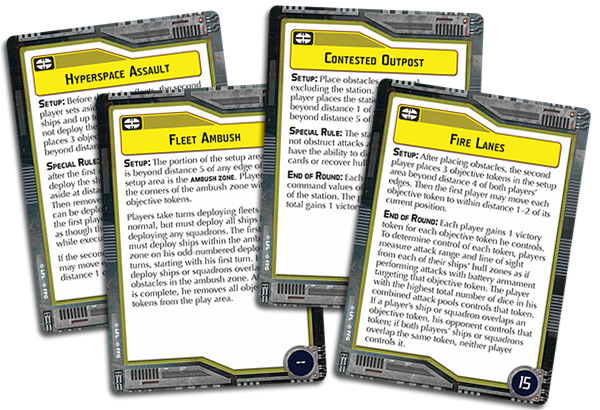
Of these defense objectives, two encourage you to fly toward objective tokens and obstacles in order to win victory tokens, and the other force the first player to respond to tricky adjustments in the deployment rules.
In games featuring the Fire Lanes objective, you can earn victory tokens by positioning your ships to seize control of the game’s three objective tokens. At the end of each round, you and your opponent compete for control of the objective tokens:
“To determine control of each token, players measure attack range and line of sight from each of their ships’ hull zones as if performing attacks with battery armament targeting that objective token. The player with the highest total number of dice in his combined attack pools controls that token. If a player’s ship or squadron overlaps an objective token, his opponent controls that token; if both players’ ships or squadrons overlap the same token, neither player controls it.”
Since each objective token is worth fifteen victory points, you could score as many as forty-five points each round by deploying and maneuvering your ships to control these objective tokens. However, that also means that you’ll likely be maneuvering your fleet in a fashion that’s a little reckless and leaves it exposed to your enemy sooner than you might like. For example, it’s going to be terribly difficult for a Rebel’s CR90 corvettes and Nebulon-B frigates to wrest an objective token away from an Imperial’s Victory-class Star Destroyers, and the effort may simply leave you vulnerable to the Imperial’s guns.
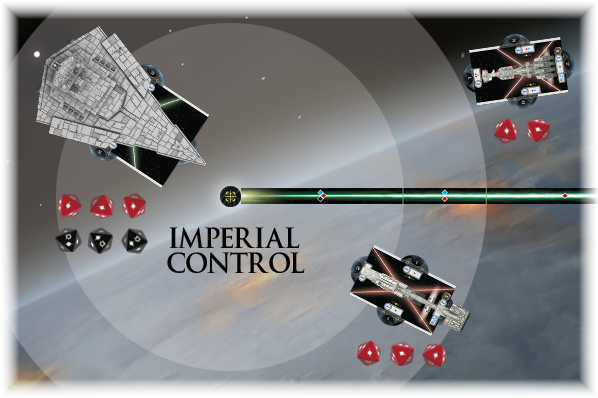
Even with the combined firepower of two Nebulon-B frigates, the Rebel player can’t wrest control of the objective token away from the Imperial player’s single Victory I-class Star Destroyer and its six attack dice.
Alternatively, if a Rebel player manages to bait you into splitting up your Imperial fleet, you may find one of your Star Destroyers exposed to a small swarm of Rebel ships while the other is hopelessly out of range.
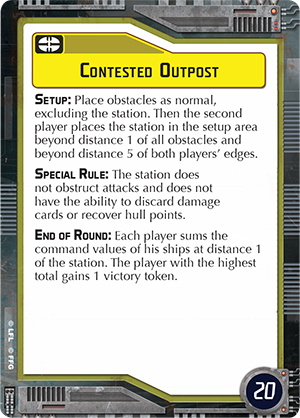
The second defense objective, Contested Outpost, is arguably the most straight-forward of all defense objectives. As with Fire Lanes, the players are encouraged to maneuver their ships in a fashion to win victory tokens; the difference, however, is that Contested Outpost offers twenty points each turn to whichever player is able to count the greatest total command value of all ships within distance “1” of the station. With as many as 120 potential victory points at stake, Contested Outpost encourages players to race into combat at close range. The trick, then, is to make sure that your ships survive long enough to count their command values at the end of the round!
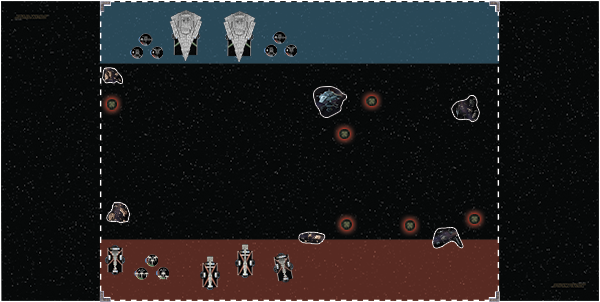
Fleet Ambush doesn’t introduce any objective tokens or victory points to change the shape of the game. Instead, it forces the first player to split his fleet in two during the game’s setup. Normally, all ships must deploy within distance “3” of its controller’s edge of the map. However, the setup rules on Fleet Ambush create an “ambush zone” in the middle of the table, at distance “5” from each edge of the table. Then, the first player must deploy every other one of his ships into this ambush zone, even as the other half must follow the standard deployment rules.
Accordingly, Fleet Ambush immediately impacts the game in two ways. First, it accelerates the game, as the players begin with ships and squadrons closer to firing range from the very outset. Second, it allows the second player to isolate some of the first player’s ships, leaving them more vulnerable to the second player’s fleet. Still, even though Fleet Ambush, like all objectives, favors the second player, you might choose to face it as the first player if you feel you can quickly assemble your fleet or use the positioning to your advantage, possibly by racing your Assault Frigate Mark II out of the ambush zone and to the side of your opponent’s ships.
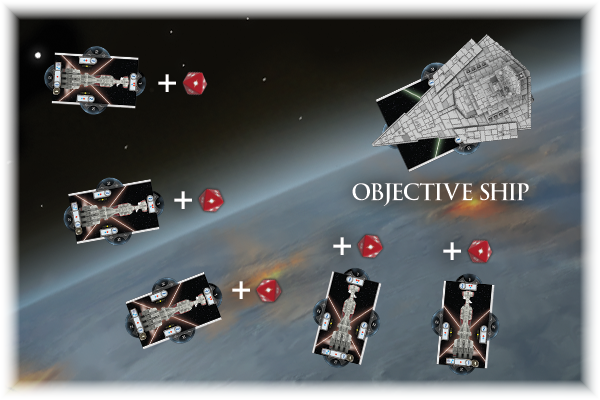
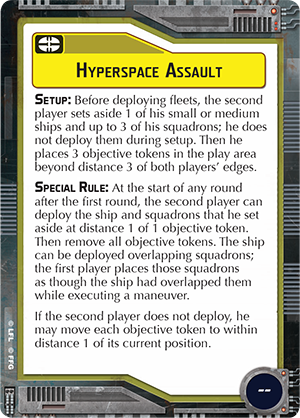
Finally, Hyperspace Assault allows the second player to set up a deadly flanking maneuver with surprising ease. At the beginning of the game, the second player sets aside one of his small or medium ships and up to three squadrons. These are not deployed during setup. Instead, the second player places three objective tokens in the play area beyond distance “3” of both players’ edges, and the ship and squadrons that were set aside can enter within distance “1” of any of these objective tokens at the beginning of any round after the first.
This means that as the first player, you have to adjust your strategy and the way you maneuver your fleet. You know that your ships are going to be flanked at some point, but, in the meantime, you have a significant advantage in firepower among the ships in play. Then, if you’re running a fleet of Star Destroyers against a Rebel player, you might be willing to risk the flank, guarding your back with a Gladiator-class Star Destroyer, even as you rush your Victory-class Star Destroyers forward toward the bulk of your opponent’s fleet.

Few Rebel fleets can survive the punishing volleys of a Victory-class Star Destroyer that establishes a solid flanking position.
On the other hand, if you’re playing this objective with a Rebel fleet that’s facing the possibility of being flanked by a Victory-class Star Destroyer and a trio of TIE bombers, you may want to race your ships out of the area at top speed. The question, of course, is whether or not you’ll be able to gain any advantage through your adjusted tactics.
Navigation
The four navigation objectives are Intel Sweep , Minefields , Superior Positions , and Dangerous Territory .

Three of these navigation objectives encourage players to interact with objective tokens, while the fourth objective, Superior Positions, adjusts the players’ starting positions and their ships’ initial trajectories.
At first glance, Intel Sweep appears to favor fast and agile ships. During setup, each player chooses one ship to mark as an objective ship. Then, whenever this objective ship reveals a command dial within distance “1” of one of the game’s five objective tokens, its owner scores a victory token. Unlike most victory tokens, these aren’t worth anything on their own, but the player who manages to score the most victory tokens ends up collecting seventy-five victory points at the end of the game.
Still, while the fast, agile ships are best suited to collecting the objective’s victory tokens, only one of them can be the objective ship, and since only the objective ship can actually collect the victory tokens, it’s going to be a heavily favored target. Accordingly, you may actually consider incorporating Intel Sweep into a strategy built around utilizing a fleet of heavy ships that can quickly deal a punishing amount of damage to a single ship and that can simultaneously endure the brunt of whatever your opponent may throw against you.
Meanwhile, players will find it much more difficult to fly their ships safely about the battlefield in any game featuring the Minefields objective. Not only will you have to avoid damaging collisions with obstacles; you’ll have to avoid the explosive damage of the game’s six mines. Moreover, since the second player places all the mines, this objective grants him the means to influence the first player’s flight lanes.
The Imperial player uses the Minefields objective to force the Rebellion’s ships to engage his Star Destroyers head-on or suffer damage in an explosive minefield.
Conversely, the Dangerous Territory objective rewards the second player for flying into the thick of the game’s asteroid and debris fields. If this is your active objective, you, as second player, would place one objective token on each of the game’s obstacles. Then, whenever a ship overlaps an obstacle, its owner can remove the objective token from the obstacle to gain one victory token, each of which is worth fifteen victory points at the end of the game. However, for the first player to win any of the tokens on the asteroid or debris fields, he needs to suffer the obstacles’ detrimental effects, either taking one faceup damage card or suffering two damage against a single hull zone. As second player, though, you ignore the effects of any asteroid fields or debris fields that your ships overlap, making this objective a good choice not only for anyone planning to navigate the game’s obstacles to score victory tokens, but also for anyone who would simply prefer to keep obstacles from interfering with his pursuit of enemy ships.
Finally, Superior Positions forces the first player to deploy all of his ships and squadrons before the second player deploys any, granting the second player perfect knowledge of his opponent’s deployment strategy. If you’re the second player, Superior Positions may allow you to line up all your guns on an approach at the side of your opponent’s fleet, or it may help you get into flanking position where your attacks against the rear hull zones of your enemy’s ships can help you score victory tokens. And since you score victory tokens for every attack that deals damage, not just for attacks performed by your capital ships, Superior Positions is an excellent objective choice for fleets built around squadrons with the bomber ability.
Meeting Your Objectives En Route to Victory
Unless one player manages to eliminate all opposing ships before the end of the sixth round, the winner of a game of Armada is the player who scores the most points. Many times, you or your opponent will score the majority of those points by destroying enemy ships and squadrons. Each ship or squadron is worth a number of points equal to its fleet cost, as well as the fleet cost of its upgrades.
 You could get thirty-nine points for destroying your opponent’s
CR90 Corvette B
. Your opponent might score 113 points by destroying the
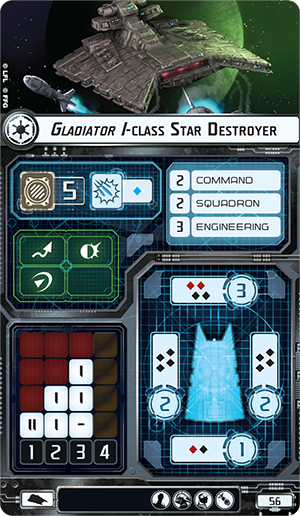
Gladiator I-class Star Destroyer
that you outfitted with
Admiral Screed
,
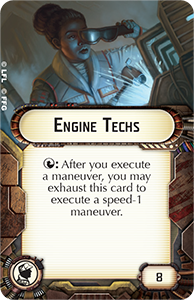
Engine Techs
,
Expanded Launchers
, and the
Demolisher
title. Or you might score 120 points by winning all six of the victory tokens available in the Contested Outpost objective.
You could get thirty-nine points for destroying your opponent’s
CR90 Corvette B
. Your opponent might score 113 points by destroying the
Gladiator I-class Star Destroyer
that you outfitted with
Admiral Screed
,
Engine Techs
,
Expanded Launchers
, and the
Demolisher
title. Or you might score 120 points by winning all six of the victory tokens available in the Contested Outpost objective.
In Armada, it never hurts to destroy your opponent’s ships, but it’s not the only way to win the war. In the end, you must always adjust your strategy to balance your pursuit of enemy ships against against your pursuit of the points you can earn from the objective. In the balance lies victory.
What objectives best suit your style? How would you use them with your favorite fleet? Which would give your fleet the most trouble, and how would you adapt? Share your thoughts with the other members of the Armada community in our forums. The time to deploy your fleet is fast approaching!
No products found.
Related News


OP Announcement From Atomic Mass Games
News on the World Championships for Star Wars™ Miniatures Games.

